下载Github客户端
Github下载地址:https://desktop.github.com/
- 登录Github账号:QQ邮箱
- Clone Repository到本地:samhe666.github.io
- 博客文章用用markdown语法,写好统一放在_post文件夹下上传。
下载Typora和Picgo
Typora下载地址:https://typora.io/
Picgo下载地址:https://github.com/Molunerfinn/PicGo/releases
配置Typora + Picgo
-
Gitee的图床已经设置好了,这里并不需要去管它。地址:https://gitee.com/samhe666
-
Picgo->图床设置->Github图床:
设定仓库名:SamHe666/blog-imgs/
设定分支名:master
设定Token:192ed2f677afecc211d321d5b41912ff
指定存储路径:留空
设定自定义域名:https://raw.githubusercontent.com/SamHe666/blog-imgs/master
备注:如果忘了Token,然后就去到Gitee的仓库里面,SamHe666->setting->Security Settings->Personal access tokens->删除并生成新的token即可。
-
Picgo->PicGo设置->设置Server->参照如下:

-
Picgo->PicGo设置->时间戳重命名->打开。
-
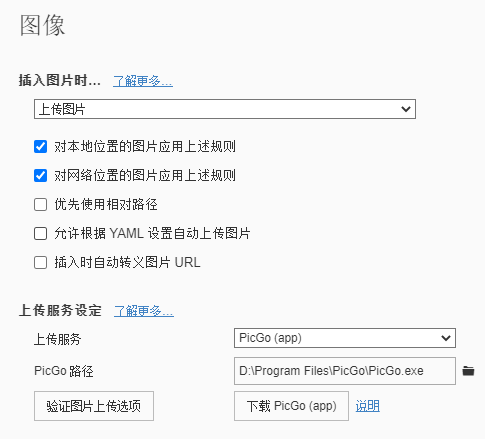
Typora要先设置成中文,picgo.app只支持简体中文。然后偏好设置->图像->按照以下配置->验证图片上传选项。
-
然后无论是截图粘贴还是拖拉插入图片,图片都会实现自动上传并获取url。
写博客
- 博客文章必须按照统一的命名格式
yyyy-mm-dd-blogName.md - 开头要贴配置信息段(YAML Front Matter)。新建文件,打—然后回车即可。
- 在文章开头信息中心增加
toc: true描述即可打开文章目录显示。
Reference
- https://www.jianshu.com/p/a1e2cf01e05f
- https://www.jianshu.com/p/4cd14d4ceb1d